Tuesday, July 30, 2013

Wall design

I saw this great picture in HGTV magazine of a fun wallpaper design that I thought would be fun to replicate. Since we have lots of space, but very little wall art, I figured a simple diamond shaped wall design would add some great design to an otherwise plain room. It turns out my simple diamond design was a lot of work to achieve near perfect straight lines and spacing, not to mention four rolls of painters tape. (I recommend FrogTape to prevent paint bleeding.)

To achieve this design:
  1. Paint the wall the color you would like to be your accent color making sure to leave the painters tape around the wall edges and trim for when you paint over it with the base color.
  2. Select a simple design you would like to use and using a ruler mark out the distance you would like to have between each design. For the diamond shape I marked the base with a ruler where I would start each line of tape. Then I eyed the distance stretching the tape out about four feet and lining it straight from the mark, periodically checking the distance between lines along the distance of the tape to ensure equal spacing. I worked the distance of the wall from one edge to another then went back over the same distance to create a section of diamond shapes before moving up the wall.
  3.  Finally I painted the wall the base color, being sure to press down all the tape. I did two coats to ensure there was a sufficient color difference between the accent and base colors. Allow the paint to just dry before removing the paint to more easily blot up any bleeding while also preventing any smearing. And tada, you're done!


Shades dyeing project

The curtain in our master bathroom had water spots on it from its proximity to the bathtub. I tried to wash them out, but the spots remained. Since we needed the curtain both for privacy and to keep the sun out I decided to dye the fabric brown to cover up the water spots and hopefully give a bit more shade. I did get rid of the water spots, however it did not provide much more shade, but it does add some nice color to the bathroom.

To dye fabric shades you'll need fabric dye (you can find an assortment at your local fabric store and basic colors at most grocery stores. Be sure to know the type of fabric you are dying as man-made fabric will require special dyes.), plastic tub, flat-head screwdriver, a staple gun, a seam ripper, and needle & thread:
  1. Remove the fabric shade from the wood frame by using the flat-head screwdriver (or whatever will work) to pry the staples from the wood frame.
  2. Once the fabric is removed untie the strings that pull up the shade from the base of the fabric.
  3. Now the fabric is detached from the frame. Locate the wood poles supporting the shape of the fabric and use the seam ripper to open one seam and remove the wood poles.
  4. Now you will be left with just the fabric and possibly some "o" rings that were used to thread the strings through. (You can leave the "o" rings in as they will not be affected by the dye.) Follow the instruction on the dye packet and dye the fabric, washing it alone in the washing machine after to prevent bleeding.
  5. Allow the fabric to dry. Replace the wood poles back in their slots and sew up the seams.
  6. Line up the fabric with the wood frame and staple starting with each edge until the fabric is taught and securely fastened.
  7. Finally re-thread the string through the "o" rings tying it at the bottom.
*Parts of this method can also be applied to other projects involving dying fabric or altering articles similar to shades. I also followed this method to add blackout fabric to my bamboo shades in the master bedroom to block out sunlight. 

Before:


After:

Sunday, July 28, 2013

Kitchen chair reupholstery

Since we moved to our house from a little, one bedroom apartment in Seattle, we did not have anything in the way of a table aside from a coffee table and a desk and now we have space for both a kitchen and a dining room table. And since we live in a particularly popular retirement area I decided to check around the local thrift stores for an old dining table to reupholster. I ended up finding one that was a perfect fit for our kitchen area that I could easily update by reupholstering the chairs.

Now for reupholstering kitchen chairs all you'll need is some upholstery fabric, a screwdriver, and a staple gun. I found this great blue print fabric for 50% off at Joanne's. (They always have great coupons. I recommend getting their free app. Then you don't have to clip or remember any coupons.) As for the actual reupholstering, it's actually pretty easy.

  1. Unscrew the seat from the frame of the chair.
  2. Use a small flat head screwdriver (or whatever tool will fit) to pry the old staples off the back of the seats and remove the old fabric. However, if there is not a lining fabric keeping the padding attached to the chair, do not remove the old fabric, just staple the new fabric over it, unless the old fabric will show through or is too dirty. 
  3. If you need to remove the fabric which is keeping the padding attached to the chair make sure to lay the fabric under the padding and kneel on the back of the seat and staple the fabric on each edge on the back of the seat so the fabric stays taught and staple around the edges to secure the fabric.
  4. Trim the excess fabric off the seat.
  5. Screw the seat back on the frame and voila!

 The kitchen tables with the old fabric.


The chairs with their updated upholstery.

Thursday, July 25, 2013

My dream closet

This was one of my first undertakings since it was always my dream to have my own walk-in closet all to myself and now I knew we'd finally have room outside the closet for my husband's clothes. However, the past owners installed these large closet cabinets from Ikea, and although very useful, they were also brown and made the closet look smaller and darker. So I decided to paint them ivory to match the closet walls with gold accents. I also added a silver full length mirror ($20 at Walmart), a shoe rack ($10 Ross) and all wood hangers ($8 for 10 at Ross) to add a feeling of luxury. Here's one of my favorite rooms:

 Here's the brown closet inserts before.

Since the wood is actually compressed wood with a laminate seal I had to sand it first for the paint to catch 

...otherwise the paint would scratch from the smallest nick.

It was a rather long process. This was after two coats of primer.

I then took two more careful coats of the ivory paint to cover the wood laminate.

For the drawers I painted the fronts of the drawers and edges with gold paint since I could not take the drawers out and it would be very difficult to paint inside each drawer. The gold matched the wood inside the drawers enough to blend in.


 Now the closet is so much lighter and is the perfect, luxurious display for all my clothes.

Sunday, July 21, 2013

First project - Entryway flowerbed


This is my first project since starting my blog, so I wanted to showcase the steps by step process of completing my project of planting a flowerbed in front of our entryway.

The view of the future flowerbed from the entryway.

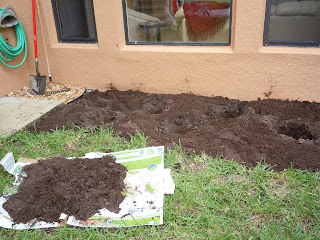
First I laid out the area I wanted to be the flowerbed and using a hoe I ripped out all the grass and tilled the soil.

Since I have a small yard and not a lot of plants I've been using old cardboard to hold yard debris for taking to the curb.

I then laid out the plants how I wanted to be arranged.

I then dug holes big enough to fit the full plant base, watching out for sprinkler lines like this one, which aren't always where you think they are.

I put about half of the soil around the holes and half on another flattened cardboard box (or a wheelbarrow if you have one) to use to fill in around the plants.

I then rolled out landscape fabric, securing the edges, and cutting minimal slits over the holes to cover up to the base of the plant.

I first watered the holes to soak the roots, planted the plants, filled in the holes to match the ground level, wrapped the landscape fabric close to the plants to keep out the weeds, and wrapped the edging around the flowerbed, staking it into the ground.

*If the plant roots are so tight you can't pull the plants out of the pot, use gardening snips to cut the side of the pot and holding onto the bottom stem of the plant, pull the plant out of the pot over the hole, so the extra soil fills the hole.


I then dumped three bags of mulch on the flowerbed to both beautify the flowerbed and maintain moisture.